

Life Before and After "I Do"
Wednesday, April 27, 2011
Tuesday, April 26, 2011
Royal Wedding
On Comcast right now, there's an On Demand film called William and Kate. Just now, a sports announcer for the Chicago/Indianapolis play-offs game just mentioned a royal wedding countdown... I can't wait!!!
Monday, April 25, 2011
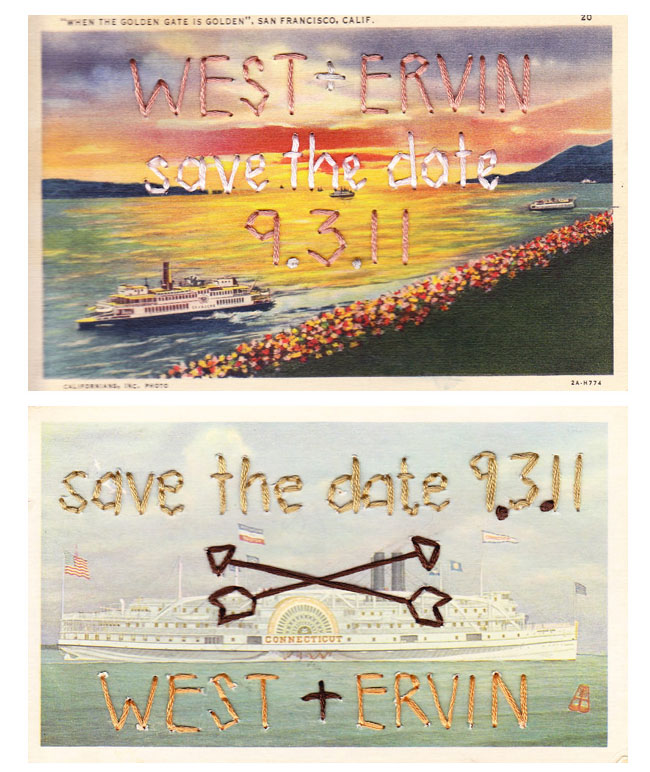
Vintage Invites
I really like this glimpse of a vintage travel wedding! We're doing tag save-the-dates and I totally bought old stamps to paste onto the invites!!!


Thursday, April 21, 2011
Dress Making Part III
Okay, I haven't gotten to work on my dress today. However, following up on the sewing resources I posted last night, I wanted to document my progress so far.
My dress-making journey starting with the discovery of a very helpful article I found at our inn in Valley Ford last weekend. It wasn't a publication I was familiar with, but I'm thrilled to know of it now! The magazine is Craft, and it's publication #5 (which I was unable to find on the website, although I did find their Wedding section!)
This article, along with the sewing tips I remembered while making my preview dress gave me the confidence to start this project.
Step #1: Get your measurements.

Step #2: Make your pattern on craft paper. Add an inch to each edge for the seam. (I draw my actual seam with a dashed line and the extra inch in a solid line.

Step #3: Cut your fabric along the solid line. Cut 2 sets of the bodice (one will be the liner).

Step #4: Prevent fabric fraying by sewing a zigzag stitch along the fabric edges. (Be careful to unfold fabric first!)


Step #5: Sew the skirt:


Step #5: Fit the bodice.


This article, along with the sewing tips I remembered while making my preview dress gave me the confidence to start this project.
Step #1: Get your measurements.

(The left image is what I used to make this dress. The numbers are half of my actual measurements, as I'm cutting them along the fold of the fabric. The "+1" is the extra inch I wanted for the seam or sewing mishap. It's always better to have too much fabric than not enough.
The image on the right is my general design, although I did use it to make my preview dress. After reading the Craft article, the pattern on the left was much more helpful.
The preview dress design required constructing the bodice from 5 pieces of fabric, whereas the design on the left had 1 piece of fabric and only required bullets taken in.)
Step #2: Make your pattern on craft paper. Add an inch to each edge for the seam. (I draw my actual seam with a dashed line and the extra inch in a solid line.

Step #3: Cut your fabric along the solid line. Cut 2 sets of the bodice (one will be the liner).

(Note that the fabric is still folded in half.)
Step #4: Prevent fabric fraying by sewing a zigzag stitch along the fabric edges. (Be careful to unfold fabric first!)


Step #5: Sew the skirt:

- Putting the "right sides" (or, the side you want people to see) of the fabric together, sew the sides (or back, if you've only cut one seam like I did) along the dashed line. Leave 1 inch at the bottom seam open and 2 inches open at the top.
- Try it on to make sure it fits.
- Iron the seams flat.
- I'm usually weary of cutting off extra fabric at the seams until I've sewn the top to it.

Step #5: Fit the bodice.
- Pin the bodice onto you along the 1-inch seams (or "seam" if you're making a dress like mine with one back seam). Make sure the "right side" of the fabric is touching you. I usually have to pin on the dotted line along the front of my torso and then rotate the piece until the pinned seam is in the middle of my back (or "seams" are directly under my arms).
- You'll notice that the bodice will be really baggy in some areas. Pin the bullets under the breast first. To pin, pinch some of the extra fabric together under the fold of the breast until the fabric is tight against the area and pin it. Pin as much of the bullet (from top to bottom) as possible, so your sewing will be as accurate as possible. Pin both bullets (one under each breast) at the same time. In other words, after you pin one part of a bullet under one breast, pin the same part on the other breast and so forth. The bullet should start at the nipple and end at the bottom of the bodice.
- After you've pinned both bullets under the breast, sew along the pins (starting at the nipple). Try the bodice on in front of the mirror to make sure there are no bumps or bubbles. Also, make sure the tops of the bullets match (otherwise, the "nipples" of the bodice will look uneven).
- Do the same thing to the "liner" bodice (the second set you cut for the liner).
- Pin the bodice onto you again along the inch seam. Then, pin the side bullets (if you need them) in the same fashion as the breast bullets.

When you're finished sewing the bullets to both bodice pieces (outer and liner), iron them flat and try the bodice on once more.
Step #6: Sew the outer bodice to the liner bodice.
- With the right sides together, pin the tops of the bodices together along the dashed line. Start pinning from the very middle of the bodice and work towards the ends. This will ensure the bullets line up evenly.
- Sew along the dashed line.
- Iron along the seam. Then, turn bodice so that the "right sides" are facing out. Iron along the top seam.


Step #7: Sew bodice and skirt together.
- Pin the bodice to you along the 1-inch seam. Put the skirt on as well.
- Determine whether you will need bullets in the skirt as well. If so, make sure they line up with the bullets under the breast.


- With the "right sides of the skirt and bodice together, pin the bottom of the bodice to the top of the skirt along the dashed line. Start with the middle of the front of both and work your way towards the ends. If you start at one end, your bodice center may not line up evenly with your skirt center.
- Once pinned completely, try it on to make sure it fits.
- Sew along the dashed line.
- Iron the seam flat and try on again.
Handkerchief Invitations
See how designer Kelli Anderson designed these handkerchief invitations from scratch!!! I want to do this!!!!!


DIY Headboard and Vintage Suitcase Makeover
Okay, so this isn't directly wedding related, but it absolutely ties to the DIY theme I'm running with. What is really interesting is the vision that the designers had for the vintage objects they were working with.
Wednesday, April 20, 2011
Sewing: Patterns with Step-By-Step Instructions
Dis from Ruffles and Stuff has SO many step-by-step tutorials for "enhancing" women's and children's clothes!!
Check them out here!
Check them out here!
Sewing: Winding and Threading Your Bobbin (Beginners start here!)
So, instead of re-creating the wheel, I searched for helpful YouTube videos for beginners.
1. Here's one from Leigh-Ann's Freckled Nest (she's adorable) about the parts of a (general) sewing machine and threading a bobbin:


1. Here's one from Leigh-Ann's Freckled Nest (she's adorable) about the parts of a (general) sewing machine and threading a bobbin:
P.S. I don't load my bobbin into the top like she does. My older machine has me load bobbins into the side, as you can see in pics from Ruffles and Stuff:


Actually, "Ruffles" and "Freckles" (as I shall refer to them) give excellent step-by-step directions for winding and threading your bobbin for the first time!
Dress Making Part II
So, yesterday I wrote about the dress I planned to make for our engagement photo session. Today, it's nearly complete! (Yeah, it surprised me as well!) I just have to put in the zipper, add a bottom hem and sew on the raw flowers!
In speeding through this project today, several things came to mind:
1. Completing a sewing project the "right" way (that is, following procedural steps) seemed to take longer, but actually didn't. My preview dress took about 9 hours to complete (as, I spent half that time fixing my mistakes), whereas my engagement dress has taken about 4. Woohoo!
2. It would take more than 1 post to teach readers how to sew. I really tried to document each step, but there are fundamental tips that one must know in order to complete each step. As I took each picture, I thought, 'this picture needs about a page and a half of explanation.'
So, my next steps involve revealing my dress in its entirety, and drafting up some fundamental sewing tips for beginners... (Excited.)
Adorable Yellow Wedding
Check out this cute glimpse, featured by 100 Layer Cake. 
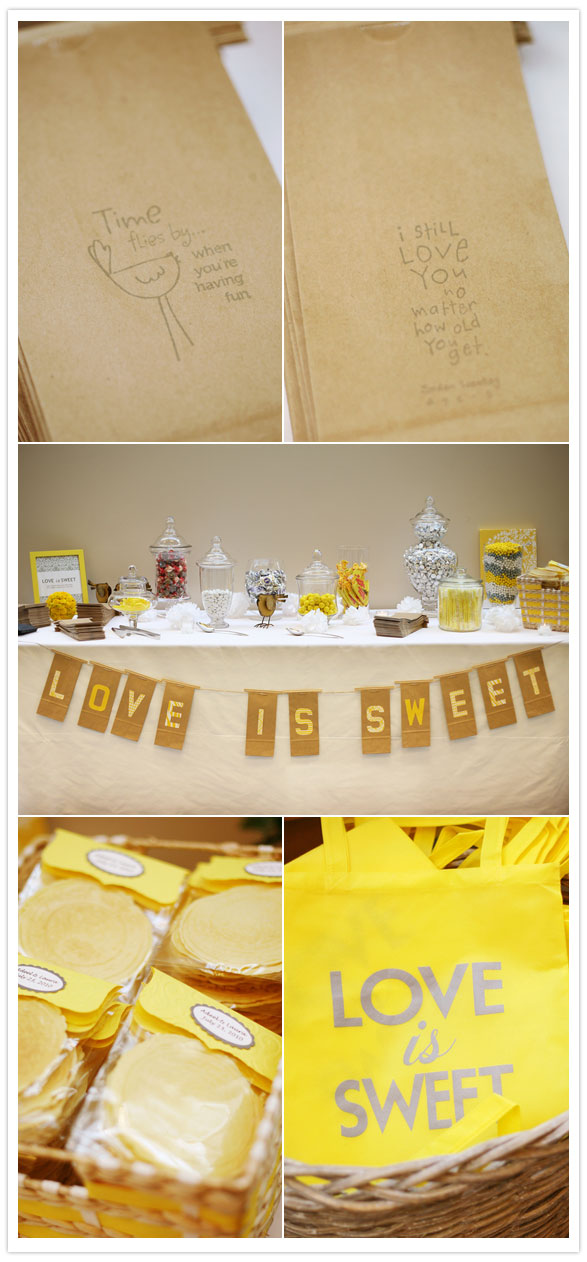
I really like the dessert table and the simplicity of the centerpieces!
Tuesday, April 19, 2011
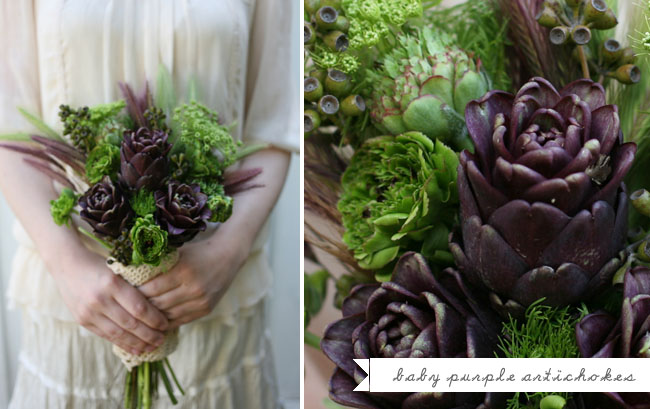
Veggie Bouquets and Centerpieces
Talk about DIY flowers! These can totally be grown in the spring before the wedding!
Antique Shopping!!
In order to create a vintage theme, we went antique shopping this weekend. Yay! It was the first of many antique shopping experiences that will focus on staging for the wedding. This is what I found today:


From left:
1. Washboard - I thought this would be great to add a magnetic Welcome! to.
2. Music sheet book - as we're considering themed tables, a Music table would be necessary. The fact that it said "Music" and "Education" was a deal breaker... Oh, and the fact that it was $1.
3. Painter's box - I figured this could be on the guest book table that people see right away. Inside (specifically, where paintings could be inserted) would be another welcome, perhaps with instructions for the guest book activities).
4. Wooden crayons - made with unfinished branches, these crayons will be perfect for the kids' table
5. Grammar books - these little handbooks will be perfect for the Literature or Education table (assuming we're adopting the themed table idea). These will be added to the vintage First Readers I bought last month.
6. City Hall postcards - I saw this idea somewhere, and I love it! You get old postcards (bleaching off old writing if they've been used already) and leave them on the guest book table for guests to write messages on.
7. Used stamps - how PERFECT will these vintage details be on our invites and save-the-dates?!
8. Pan tray - this cooking pan will be great for candy/cupcake toppings on the dessert table. I could also use it to house favors.
9. Children's wooden blocks - for the kids table
10. Old typewriter keys - I was going to make cuff links using these old S and D typewriter keys
11. Vintage letter stamps - I'll use these inital and date stamps for the save-the-dates and invites. I may also put them on the kids' table with a stamp pad as an extra activity
12. Lace doily - to cut apart and use on the save-the-dates
Things I got not featured in the pic above:
1. A vintage red gum ball machine
2. Some vintage glass jars for the candy/cupcake station
3. Old wooden shutters (detailed here) for the seating arrangement
Fortunately, the long lists of items I wasn't able to find will (hopefully) be available at the Alameda Antique Flea Market next week!
Dress Making
Whew! DIY weddings are a lot of work! I've been designing a pattern for my engagement photo dress (which I previewed at a wedding last weekend):


Here are my sketches. I'm going for a vintage pencil skirt with tapered strapless bodice. I love the raw fabric flowers I've been seeing on so many designs lately, so I'm incorporating that. The hardest part about creating my own pattern is that it's been YEARS since I've had to do so! I'm pretty lucky, actually, to have had sewing as a high school elective. My best friend's mom was the best sewing instructor, as a lot of the procedures and protocols have stuck with me. (Of course, I didn't remember half of them until I had made a mistakes on my preview dress!) Now that I remember them, I'm really looking forward to creating my engagement photo dress! With the engagement session being only 3 and a half weeks away, I'd better hop to it!

This is the shimmery white and gold cotton I'm going to use. Because it's so thin, I'll definitely have to add lining (which, is essentially done by creating a double of the design and sewing the internal and external together).

I'm going to add step-by-step photos for any DIY ladies who are interested in sewing!
Sunday, April 17, 2011
Real Wedding: Kellen and Andrew
We went to a lovely wedding yesterday. Steve's good friend Kellen got married at a beautiful venue in San Francisco.
What I love about Kellen is that she is really laid-back. She appreciates the beauty of simplicity. The little frills and details weren't going to be stressors for her - her priority was having a great time with her family, friends and husband.
There were a lot of things I LOVED about Kellen's wedding:
1. Family-style serving - It didn't matter how well you knew the people you were sitting at the table with, everyone was conversing within minutes of passing platters around the table. The catering staff had everyone eating within minutes, as they had only 5 platters to pass out to each table. The food was presented quickly and the style encouraged people to get to know one another. I loved it! We definitely want to do this at our wedding, with one change: we want to serve guests first. We don't feel the need to get food before everyone else. Instead, as we would at home, we want to serve our guests first, checking in at each table as they wait for their food. Brides and grooms typically don't eat much at the wedding anyway - they're too busy. We really want to create a sense of family during the meal, so the family-style serving and table serving order will help.
2. First Dance: Kellen and Andrew had their first dance immediately after the DJ introduced the wedding party. The DJ had all guests encircle the dance floor, and as soon as everyone had been introduced, the bride and groom stayed on the floor for the first dance. Not only that, towards the end of the song, the DJ had all guests (who were conveniently standing right there anyway) join in. It was really wonderful! As guests, we felt as though we were part of the first dance! I totally teared up.
3. Pre-ceremonial drinks: Steve and I are getting hitched at City Hall, but if we were having the ceremony right before the reception, I'd definitely open up the bar beforehand. The ceremony had all guests standing, but there wasn't a complainer in the group, as many guests stood drink in hand as the ceremony went on. It was very comfortable and enjoyable (although their amazing officiant had a bit to do with that as well).
4. Open Dessert Table: The dessert table, which was displayed from the very beginning, was open to guests whenever they felt so inclined. The desserts were these interesting donuts from Dynamo Donuts (in the Mission). It was easy, maintenance-free, informal and cute! There was no cutting of the cake, to waiting for the DJ to say it was okay to begin serving one's self... I loved it! It's exactly how I want our dessert table to roll out. Also, the donut table had take out boxes, eliminating the need for additional favors.
5. Centerpiece Quotes: Each table had the name of a place that was important to the couple. At the table, you could read quotes from the bride and groom about the place - how they felt about it, how often they went their, what the place symbolized for them... it was lovely. Not many people at the table read them, but for myself, it was charming.
6. Speeches: It was evident that Kellen and Andrew selected who was going to speak beforehand. There was none of that "let's open it up to the house and invite anyone who wants to speak" awkwardness. They had the usual suspects offer memorable moments - the maid-of-honor (who was her brother), best man, best friends and father. After those speeches ended, the happy couple were quick to end with an offering of thanks and invitation to dance.
So, with all these things in mind, I've compiled a loose schedule of events for our reception:
1. Guests arrive to open bar.
2. Wedding couple announced, first dance begins.
3. Couple greets guests (as a group), announces serving of meal.
4. As tables receive/wait for food platters, couple rotates offering individual greetings
5. Tables receive platters for family-style serving
6. As couple receives food, guests are encouraged to enjoy dessert
7. Speeches (and drinking), followed be thanks from couple
8. Dancing (and drinking)
Saturday, April 16, 2011

Tuesday, April 12, 2011
Destination Wedding: Bali
Umm, yes please! How tranquil would this be? I often find myself wondering if a destination wedding would be a better choice for us. Going to Bali probably wouldn't be more cost-effective, but oh, how lovely!


Sunday, April 10, 2011
Homemade Donut Hole Favors!
I'm totally craving sweets, so these little pretties look amazing!
http://ruffledblog.com/diy-donut-hole-wedding-favors/?utm_source=feedburner&utm_medium=email&utm_campaign=Feed%3A+Ruffled+%28Ruffled%29

http://ruffledblog.com/diy-donut-hole-wedding-favors/?utm_source=feedburner&utm_medium=email&utm_campaign=Feed%3A+Ruffled+%28Ruffled%29
Saturday, April 9, 2011
Story of Love
http://www.radiolab.org/2011/jan/25/finding-emilie/
Probably one of the most amazing love stories I've ever heard...
Thursday, April 7, 2011
Westwood Wedding!
The Bruin in me LOVES this wedding! (Especially since the couple and guests coasted to Diddy Riese for dessert!


(They seriously had their guests travel on bikes...)
Ah, the bright, huge (and phallic) Temple... How it lights up Westwood at night!
Stitched Save-the-Dates
I would really like to incorporate this somehow. Would stitching like this (for 100 save-the-dates) drive me crazy?
Wednesday, April 6, 2011
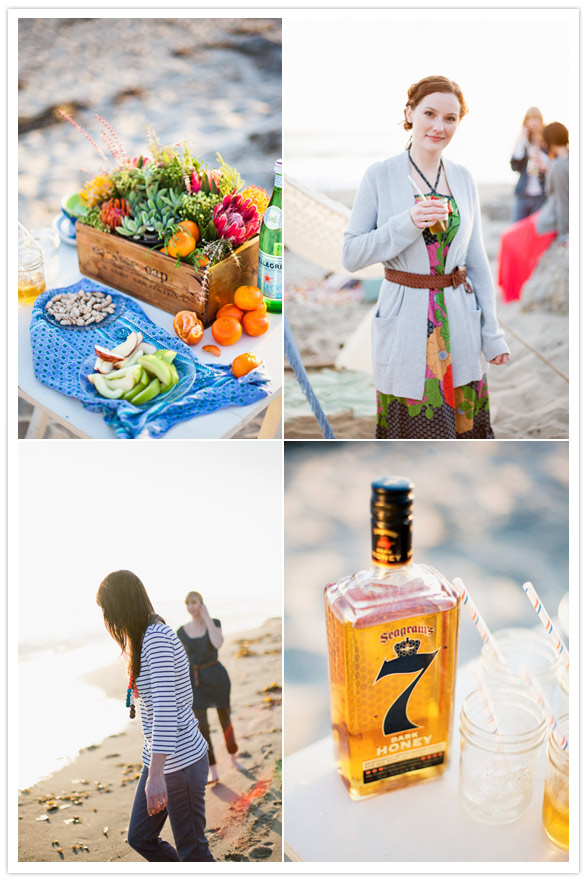
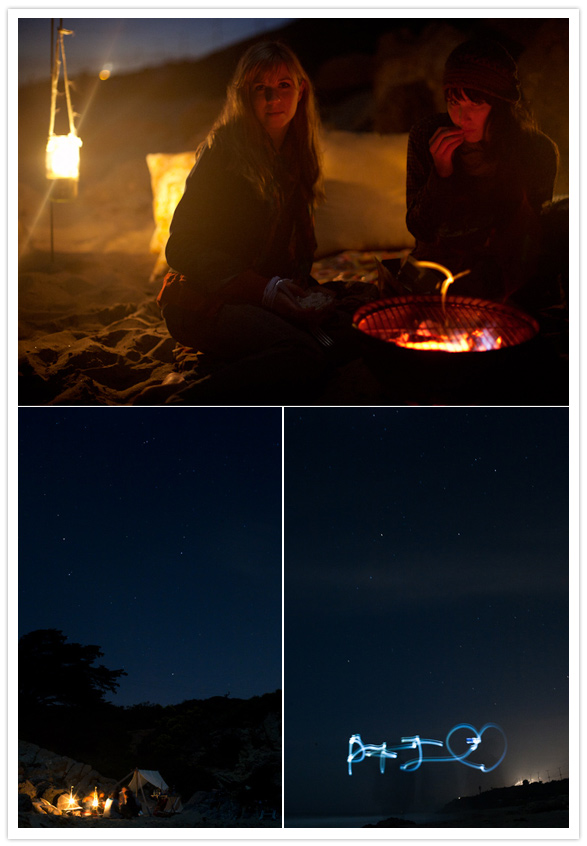
Beachy Bachelorette from 100 Layer Cake
This idea seems awesome! Get a beachside property for the weekend, set up a nice bungalow on the beach... I can definitely see that!
http://www.100layercake.com/blog/archives/13157
http://www.100layercake.com/blog/archives/13157
Subscribe to:
Posts (Atom)